

Got old furniture that feels dull or doesn’t match your space anymore? I’ve been in that exact spot. Instead of tossing it, I picked up a paintbrush, and what happened next completely upgraded my home.
In this blog, I’ll show you painted furniture ideas before and after that inspired me to flip old pieces into something beautiful. If you love soft vintage styles or bold colors, you’ll find ideas by room, color, and technique, plus beginner-friendly tips that save time and money.
No fancy tools needed, just creativity and a little paint. Ready to turn outdated furniture into your favorite piece in the house?
Why Painted Furniture Makeovers Are So Popular
Budget-Friendly Home Updates: Painting old furniture is one of the cheapest ways to refresh a room. Instead of buying new pieces, a can of paint and a little time can give your old dresser, chair, or table a totally new look.
Sustainability: Instead of tossing furniture, more people are reusing what they have or grabbing secondhand finds to fix up. It keeps items out of landfills and gives them a second life, good for your wallet and the planet.
Innovative Expression and Uniqueness: Painted makeovers let you show off your style. You can pick any color, add patterns, or even try fun textures. No two pieces turn out the same, which makes each one feel special.
Painted Furniture Ideas Before and After: Tools, Prep, and Paint Basics
Getting started with furniture painting? Knowing the right tools, paint types, and prep steps makes all the difference.
Tools You’ll Need
Getting the right tools makes the job easier and helps your project turn out better. Here’s what you’ll want:
- Brushes for corners and details
- Rollers for flat surfaces
- Paint sprayers, if you want a smooth, fast finish (optional)
- Sandpaper (medium and fine grit) for smoothing rough areas
- A drop cloth or an old sheet to protect your floor
- Mild cleaner to wipe off dirt, grease, or old polish
Having these ready before you start saves time and avoids the mess
Best Paint Types for Furniture
Choosing the right paint makes a big difference in how your furniture looks and lasts.
Chalk paint is very beginner-friendly. It gives a soft, matte look and usually doesn’t need a primer.
It’s great if you want that vintage or rustic style, but it does need a topcoat or wax to seal it.
Milk paint is another option that gives a natural, worn-in feel and is often eco-friendly, but it can flake if not sealed. Latex paint is the most common and comes in tons of colors.
It’s strong and smooth, but usually needs sanding and priming first. Pick based on the finish and feel you want.
Prep Tips for a Smooth Finish
Good prep is the key to furniture that looks clean and lasts long:
- Clean the surface with mild soap and water. Let it dry fully.
- Sand off any shiny finish, bumps, or old paint.
- Wipe the dust with a damp cloth or tack cloth.
- Prime if using latex paint or if the wood is dark.
- Test your paint on a small, hidden spot first.
- These steps help your paint stick better and make your piece look neat and smooth.
Step-by-Step Guide: How to Paint Furniture Like a Pro
Upgrade old furniture into stunning pieces with this expert step-by-step guide, perfect for beginners looking to achieve a smooth, professional finish.
Step 1: Clean and Prep the Surface
Start by removing any hardware like knobs or hinges. Then thoroughly clean your furniture with a diluted Murphy’s Oil Soap solution. This is especially important for dusty or previously stored pieces.
If the surface has any damage, like holes, cracks, or wood knots, fill them in with wood filler. Let it dry fully. Afterward, sand the entire surface lightly to dull any glossy finish and allow the paint to adhere better.
Focus on smoothing out the filled areas. Once sanding is complete, wipe down the piece with a tack cloth to remove all dust.
Step 2: Apply Primer
Priming is crucial for durability and a professional finish. Use your angled brush to reach into crevices and a mini foam roller to coat the larger surfaces. Apply one thin coat of primer evenly across the furniture.
Once dry, lightly sand the piece again using a fine sanding sponge to smooth out any texture, then wipe clean with a tack cloth to eliminate dust.
Step 3: Paint in Thin Coats
Using the same technique as with the primer,brush for details, roller for flat areas, apply your first thin coat of paint. Let it dry completely. Lightly sand between coats for the smoothest finish and clean off any dust.
Apply a second coat (and a third, if needed), repeating the sanding and wiping steps in between. Erin recommends water-based paints, such as Behr Marquee or Benjamin Moore, in satin or semi-gloss finishes for easier cleaning and durability.
Step 4: Apply a Protective Topcoat
After the final coat of paint has dried, seal your piece with a protective finish. Erin uses either Minwax Polycrylic or paste wax for polycrylic, brushing on a thin, even coat.
For wax, apply it using cheesecloth, let it sit for 10–15 minutes, then buff it with a clean cotton cloth to the desired shine. This final step helps protect the finish and extends the life of your painted furniture.
Troubleshooting and Tips
If you see drips, roller marks, or brush strokes, lightly sand those areas and reapply a thin coat of paint.
Wrap brushes and rollers in plastic between coats to prevent drying out. Erin also suggests avoiding matte paint finishes on furniture, as they’re harder to clean and maintain.
If you’re working on a large project, a paint sprayer may be used, although cleanup is more involved.
Watch the full tutorial video below for a visual walkthrough:
Learn how to paint furniture like a pro with this detailed video guide, covering prep, painting techniques, and finishing touches.
Painted Furniture Ideas Before and After
Finishing inspiring painted furniture ideas with before-and-after changes that breathe new life into old pieces. From bold colors to soft neutrals, these makeovers are budget-friendly, stylish, and beginner-approved.
White & Neutral Painted Furniture Changes
White and neutral colors never go out of style. They brighten up furniture, fit any room, and feel calm and clean. Here are easy makeover ideas you’ll love trying.
1. Farmhouse White Dresser Makeover

Take an old, tired dresser and give it a bright new look with crisp white paint. Sand it lightly, paint with chalk or latex paint, and finish with a clear seal.
Add black or wooden knobs for a nice touch. The white color brings out clean lines and makes the whole room feel fresh. It works great in bedrooms, hallways, or even dining rooms for extra storage.
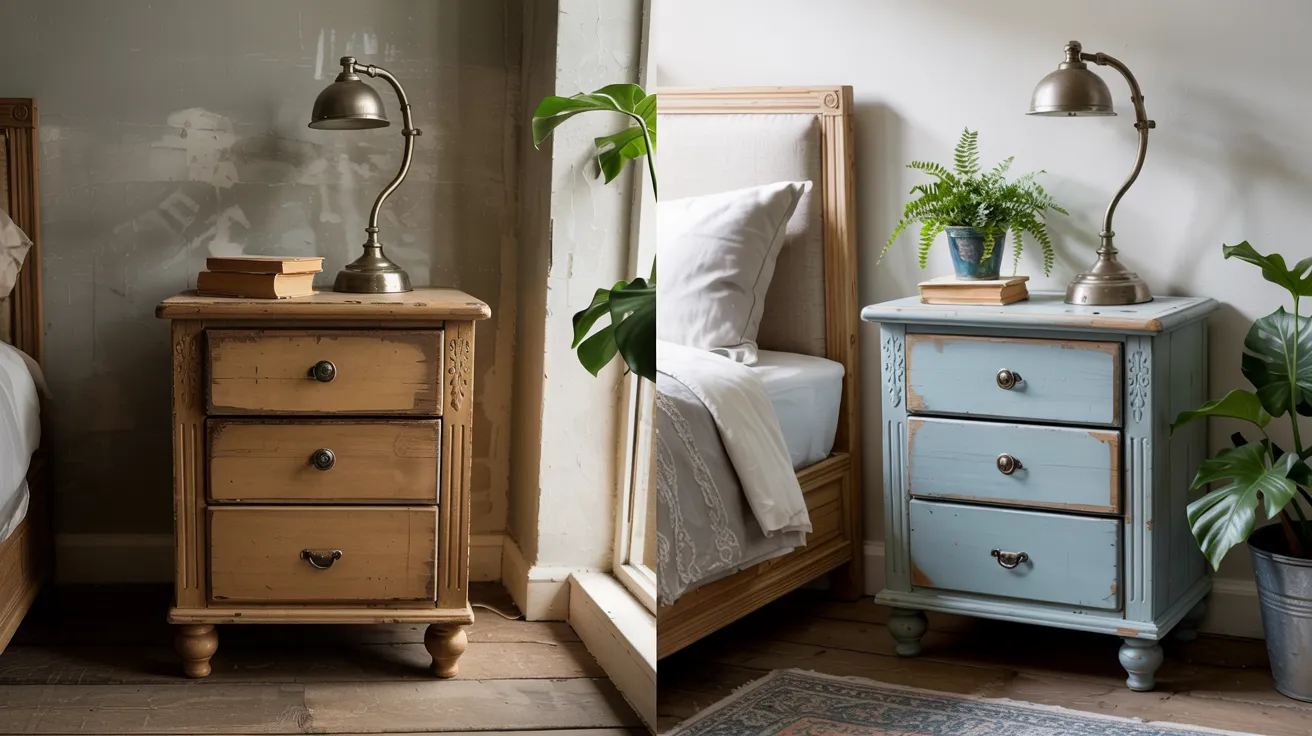
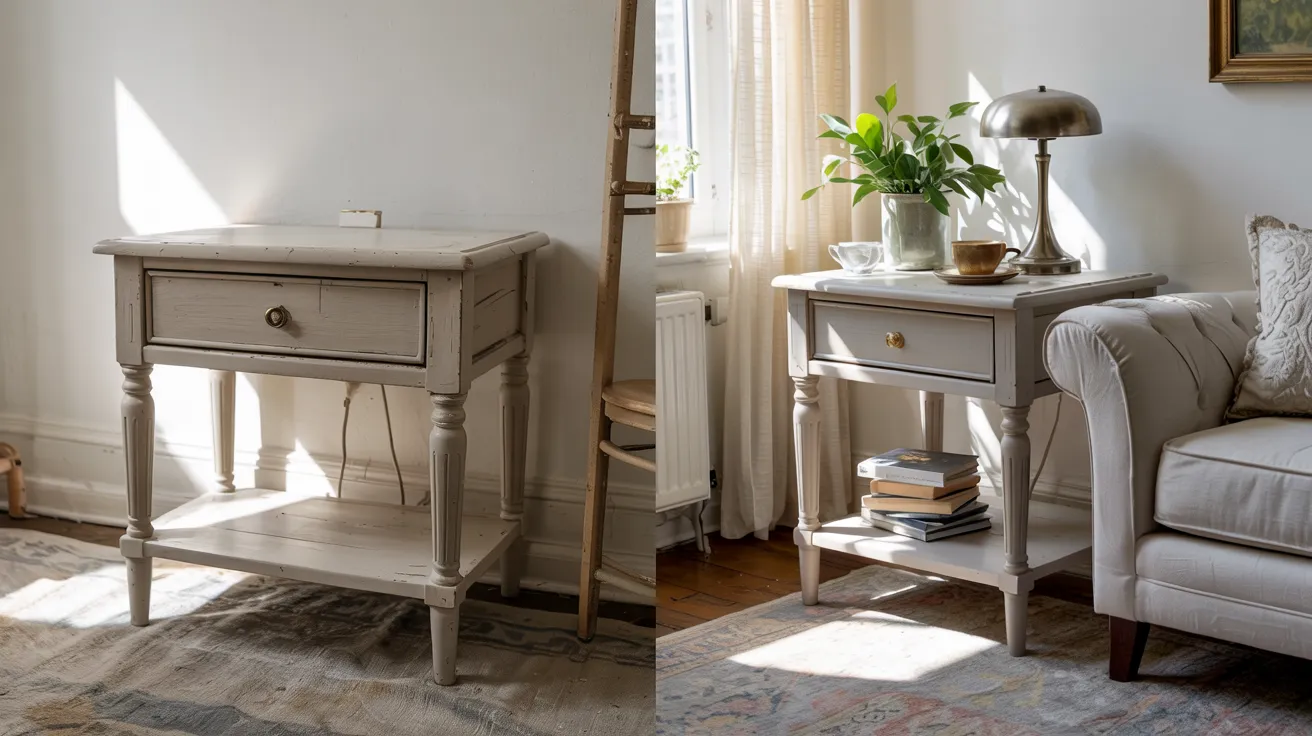
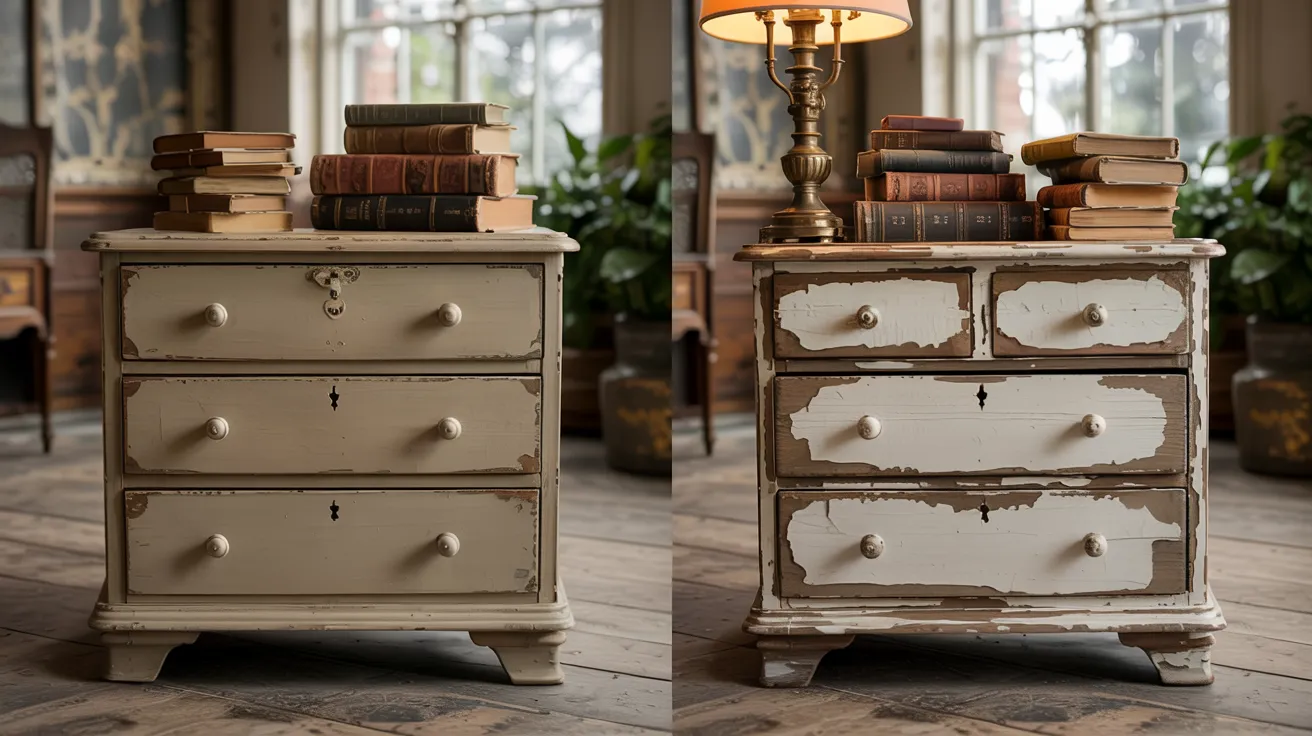
2. Creamy Off-White Bedside Table

Off-white is soft and warm, perfect for a small table next to your bed. Clean the piece, give it a quick sand, and paint it with creamy paint that feels cozy but still clean.
Add a simple knob or drawer pull for class. This color works well with both modern and classic rooms. Plus, it’s a great way to reuse an old table that still has good shape.
3. Ivory Bookshelf with Distressed Finish
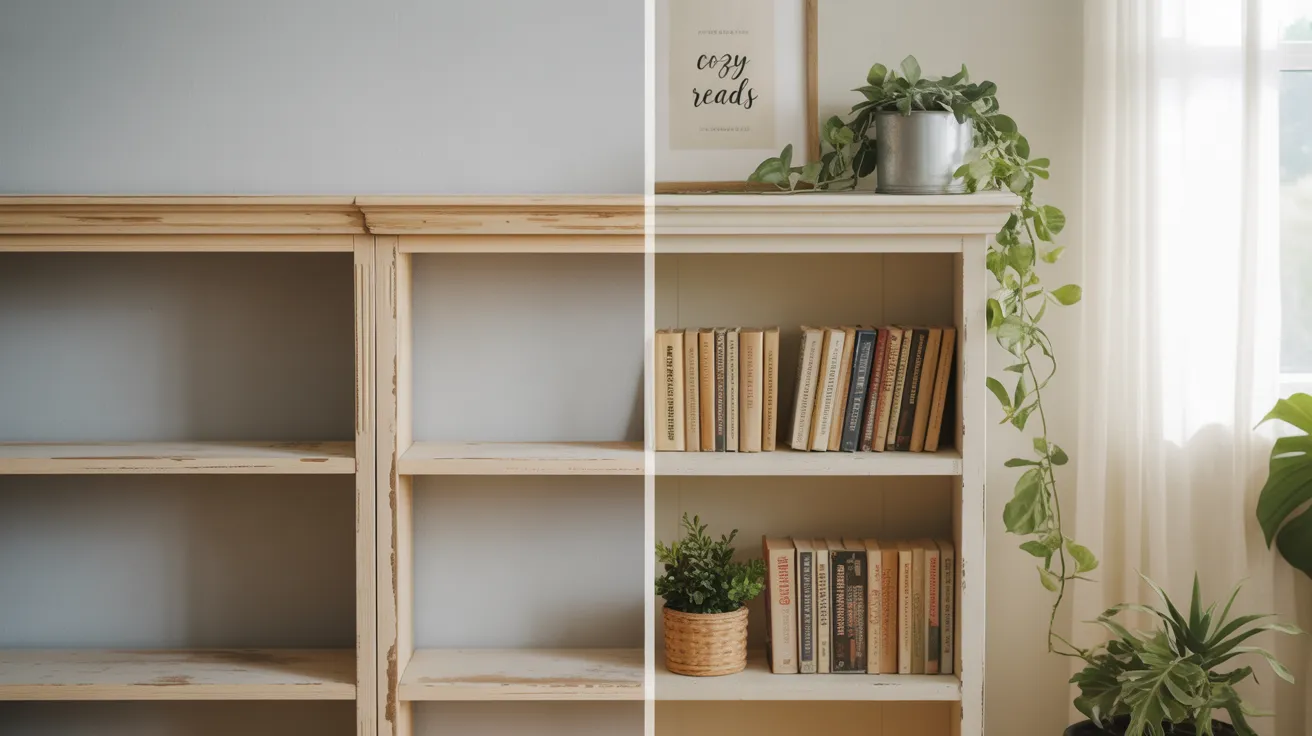
Turn a dull bookshelf into a pretty piece with ivory paint and a little sanding. After painting, lightly sand the edges and corners to make it look gently aged.
This makes the shelf look full of character, like it’s been loved for years. It’s a nice way to show off books, plants, or baskets. Works well in living rooms, bedrooms, or even kids’ play areas.
4. Beige Sideboard with Matte Seal
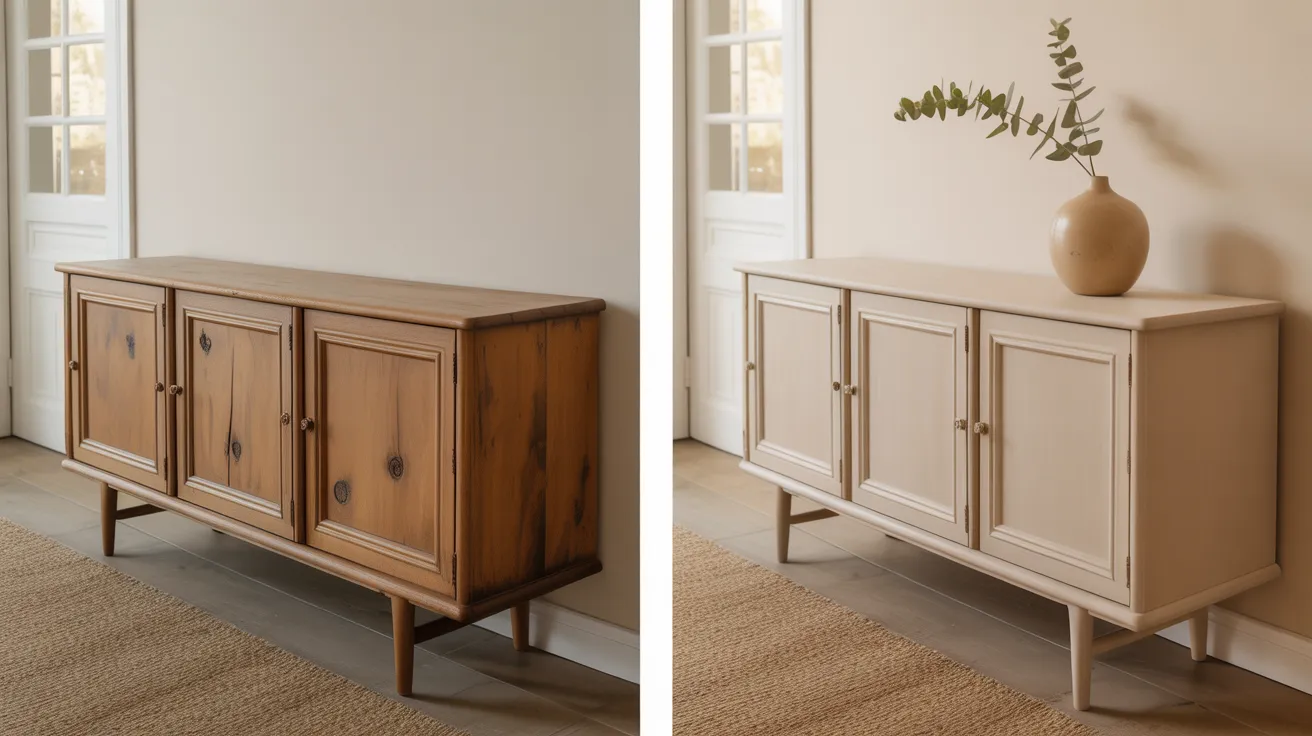
A sideboard in beige looks calm and neat, especially with a matte finish that cuts the shine. Start by sanding and painting the whole piece in a soft beige tone.
Once dry, seal it with a clear matte topcoat to protect it. This look fits well in kitchens, dining areas, or entryways. It brings a peaceful, clean feeling and matches with lots of colors and styles.
5. Two-Toned Neutral Chest of Drawers
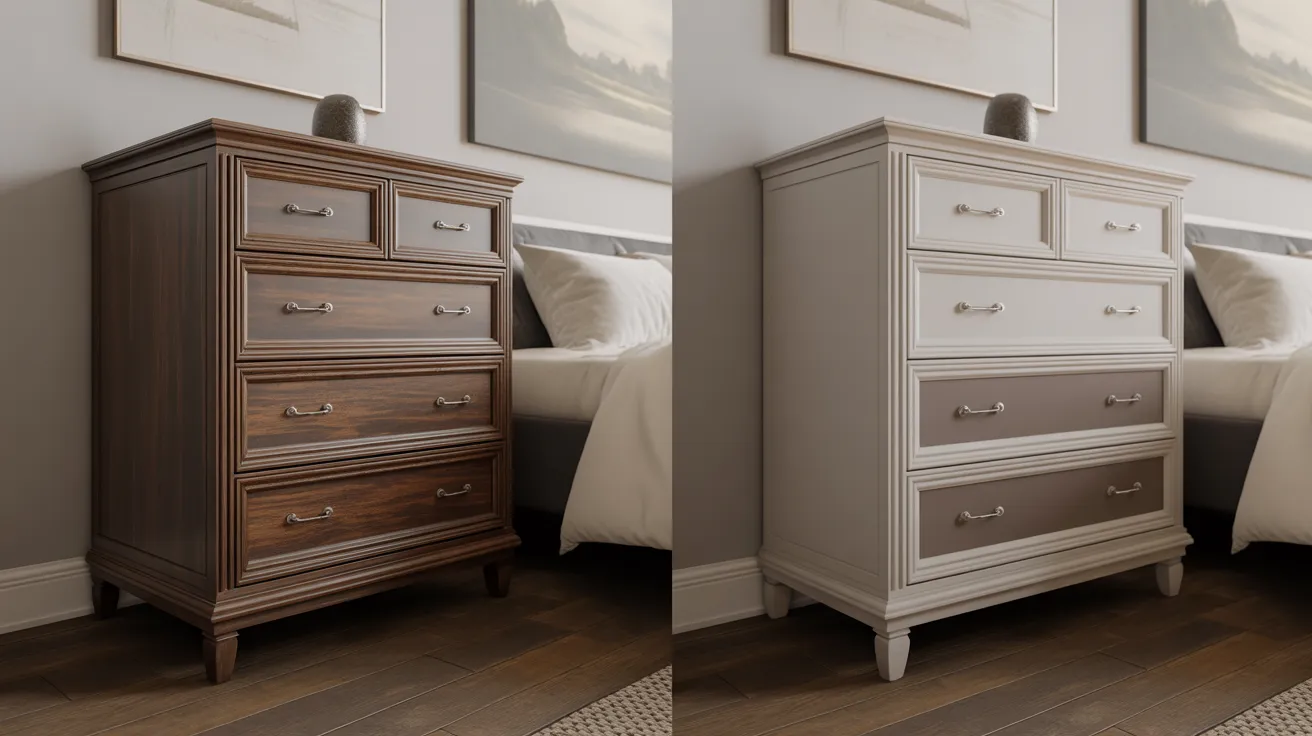
Mix it up with two shades of neutral! Paint the body of the chest in light gray or beige, and use a slightly darker tone for the drawers.
This simple contrast adds style without being bold. Use simple metal or wood knobs to finish the look. This makeover fits great in bedrooms or guest rooms. It’s an easy way to make your space feel more pulled together.
Bold & Colorful Statement Pieces
Bright colors can totally change how a piece of furniture looks and feels. These bold paint ideas add fun, personality, and energy to any space, without needing a full room makeover.
6. Teal Buffet Table Before and After
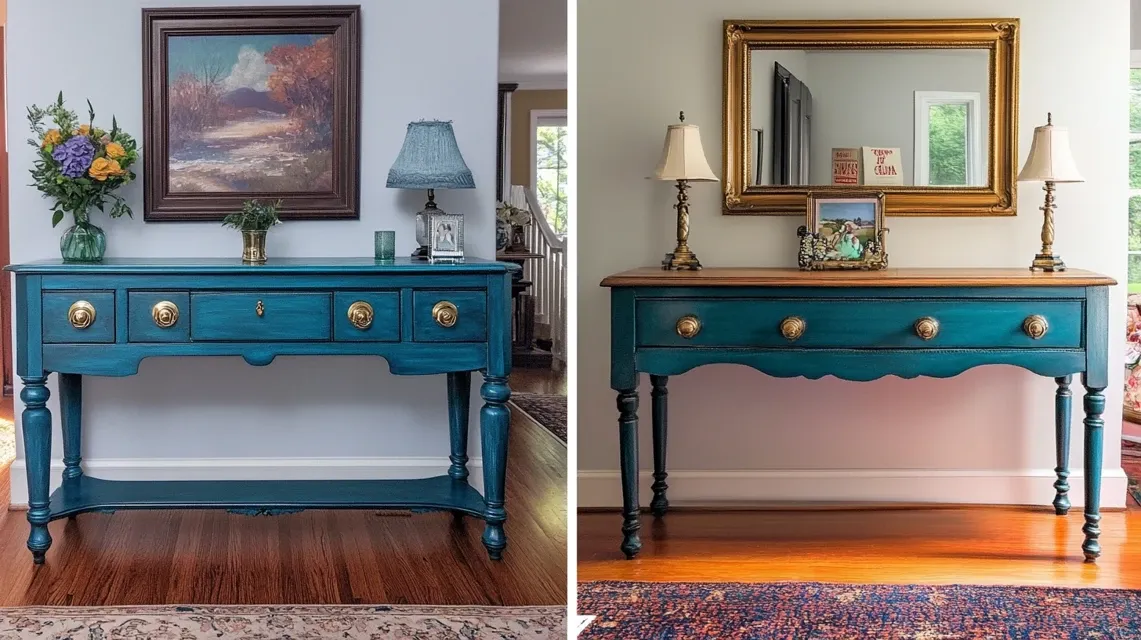
A plain buffet table becomes a showstopper with teal paint. This rich color stands out but still feels classy.
After sanding and cleaning, paint it in two coats and add clear wax or sealer. Silver or gold knobs make it pop even more. Use it in the dining room or hallway to store dishes, linens, or anything you like. It’s bold but easy to blend with your style.
7. Coral Painted Desk with Gold Pulls
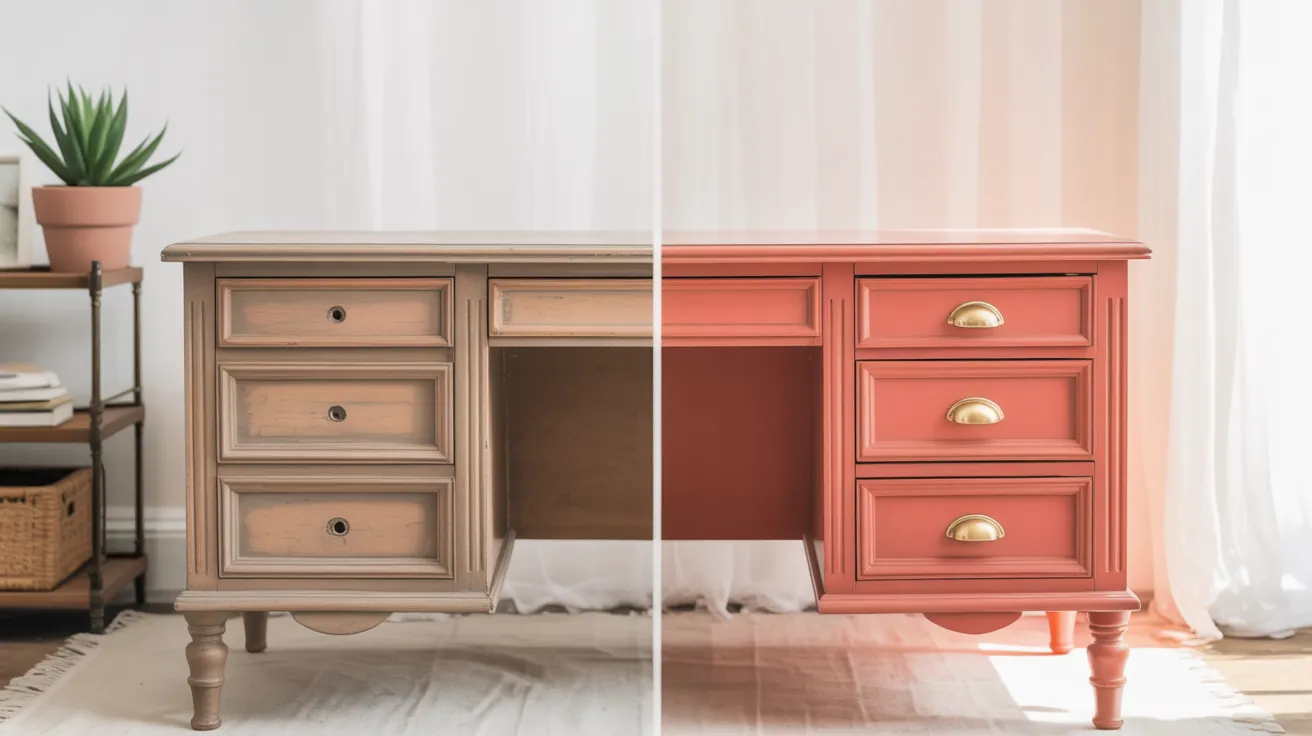
Bright coral paint makes a tired desk feel young and fun. After lightly sanding and cleaning, cover the desk with coral paint and add shiny gold pulls for a fancy touch.
This color works great in home offices, kids’ rooms, or craft corners. It’s a cheerful piece that makes you smile and adds a burst of life to any corner of your home.
8. Yellow Entry Bench Revival

Give your entryway a sunny welcome with a bright yellow bench. Clean it, sand off any rough patches, and paint with a bold yellow that lifts the mood.
Add some cute pillows or a basket underneath. It’s perfect for putting on shoes or dropping your bag when you get home. The color brings energy and warmth, making your front door area more inviting right away.
9. Forest Green China Cabinet

A deep green cabinet adds a calm but rich feel to any space. After prepping, paint the whole piece in forest green and seal it with a clear matte finish.
Glass doors, if you have them, let you show off your dishes or decor inside. This bold green works well in dining rooms or kitchens and looks great with wood floors or white walls. It’s bold, but grown-up.
10. Raspberry Pink Kids’ Dresser
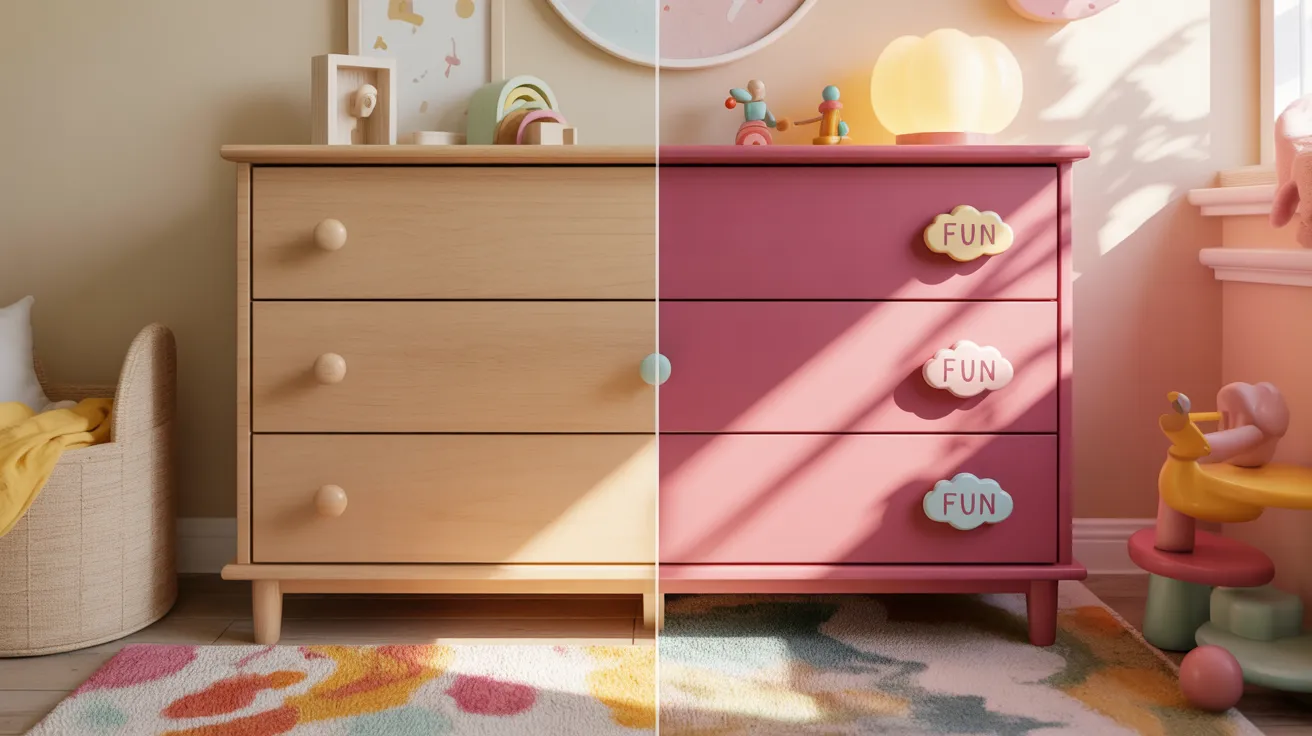
Make a child’s room more fun with a dresser painted in raspberry pink. This playful shade adds excitement and is easy to spot in any space.
Sand and prime first for smooth results, then paint and finish with a sealant. You can even let your child help pick the knobs.
It turns a boring piece into something they’ll love, and it’s an easy way to make their room special
Blue & Black Painted Furniture Projects
Dark colors like blue and black can totally change the mood of a room. These makeovers feel bold, dramatic, and a little fancy, perfect if you want something that really stands out.
11. Navy Blue Dining Chairs

Give old dining chairs a fresh, bold look with navy blue paint. This deep color adds class without being too dark. After sanding, paint each chair in two coats and let it dry fully.
Navy works well with light or wood-toned tables and looks great in both modern and country-style rooms.
Add soft cushions or mix in patterned fabric to make them even more inviting and fun.
12. Inky Black Console Table

Turn a basic hallway or entry table into a bold feature with inky black paint. It gives a clean, modern look that pairs well with metal, glass, or wood decor.
Sand and prime first, then apply two thin coats of paint. Use a matte or satin finish for a softer style. Top it with a lamp, mirror, or basket, and you’ve got a sleek spot that catches the eye.
13. Midnight Blue Dresser Flip

A worn-out dresser can look brand new with midnight blue paint. This rich shade feels cozy and bold at the same time.
After prepping, paint with a steady hand and finish with a clear seal. Add brass or silver handles for a touch of shine.
This works well in bedrooms or guest rooms, and gives storage a stylish, grown-up upgrade without buying anything new.
14. Matte Black Vanity Table
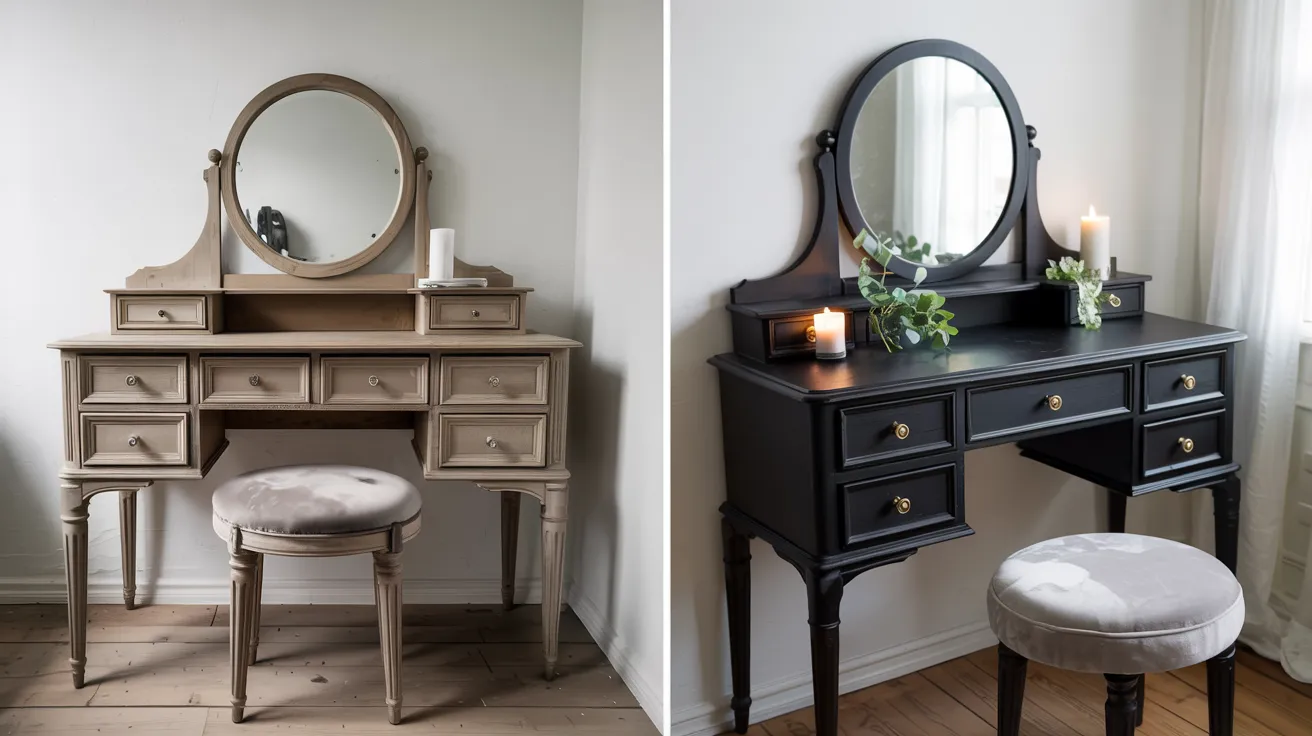
Matte black gives furniture a clean, sharp look, and a vanity table is the perfect place to use it. After cleaning and sanding, paint the piece and let each coat dry before adding another.
Use simple black or gold knobs for a sleek finish. This look fits great in bedrooms or bathrooms.
It feels fancy and stylish but is still simple enough to go with anything.
15. Dusty Blue Painted Hutch
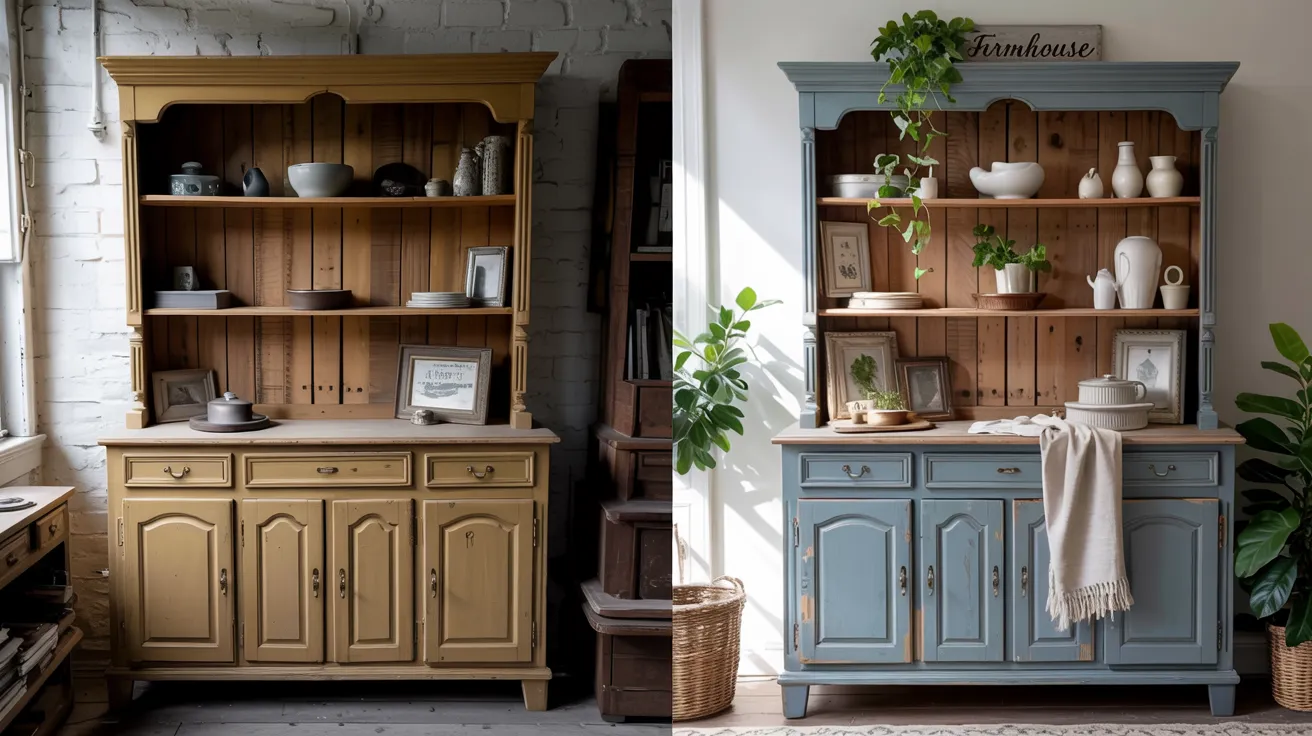
Dusty blue is soft but strong, perfect for a hutch in a dining room or kitchen. Start by sanding and cleaning the surface, then paint in dusty blue and seal with a clear coat.
This color works well with white, gray, or natural wood surroundings. Use it to hold dishes, books, or even baskets.
The calm blue tone adds quiet beauty and makes the space feel peaceful.
Farmhouse & Vintage Makeovers
Love the class of old-time furniture? These farmhouse and vintage paint projects use soft colors, aged finishes, and a little distressing to bring that cozy, well-loved look into your home.
16. Antique Buffet in Light Gray Chalk

A buffet table painted in light gray chalk paint gives off a soft, old-world feel. Lightly sand edges and corners after painting for a natural, worn look.
Add glass or metal knobs to keep that vintage style going. This piece works great in dining rooms or entryways and offers lots of storage.
It’s the kind of makeover that feels calm, classic, and like it’s been part of the home forever.
17. Farmhouse Green Storage Bench
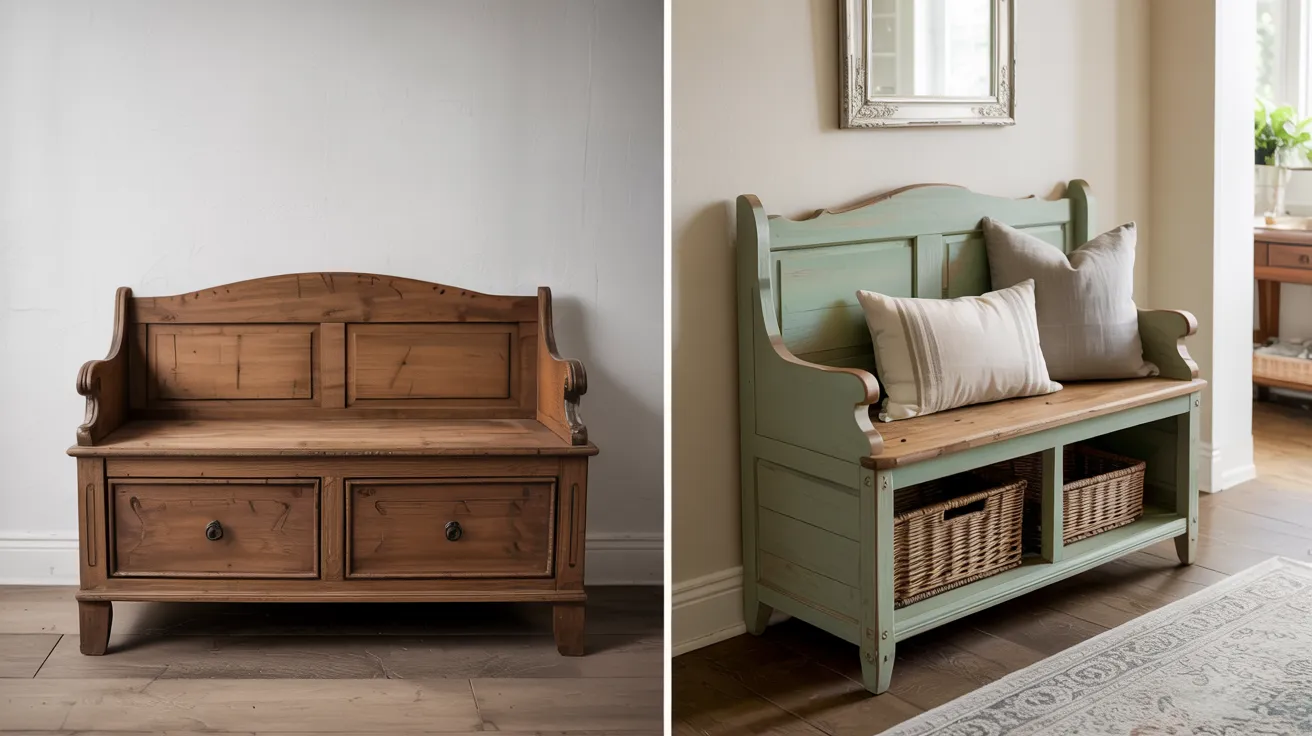
Paint a bench in a muted farmhouse green for a simple, useful seat with storage. The color adds warmth without being too bold.
Use chalk paint and lightly distress the corners after it dries. Place the bench by the door, in the hallway, or even at the foot of your bed.
It’s cozy, classy, and helps keep things tidy without losing that old-fashioned style.
18. Vintage Vanity with Aged White Finish

Turn an old vanity into something special with aged white paint. After sanding and painting, rub a little extra off the corners for a timeworn look.
Add a small stool and a mirror to finish the piece. It works great in a bedroom or guest room and gives off soft, vintage vibes.
This kind of makeover turns an old piece into something sweet and full of class.
19. Distressed Cream Secretary Desk
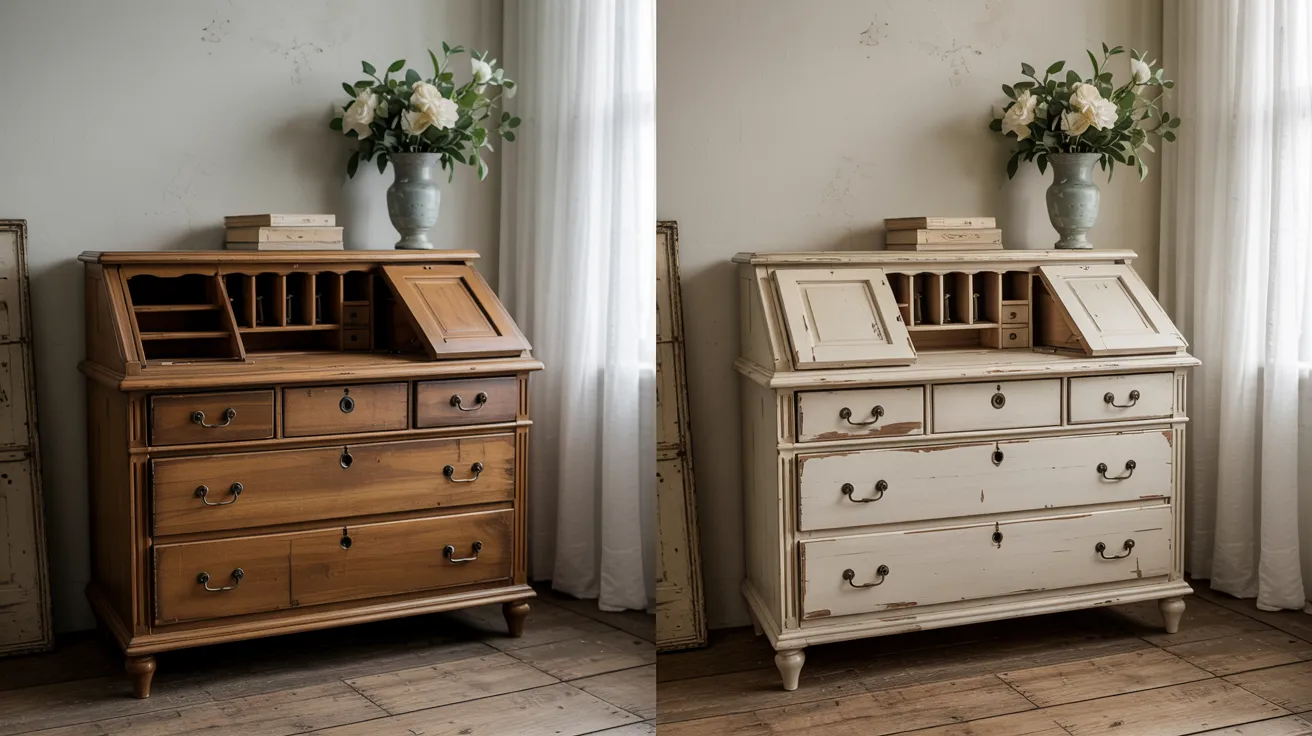
A secretary desk in creamy paint brings vintage style and function together. After cleaning and sanding, paint it with chalk or milk paint, then gently distress the edges.
Add dark knobs or handles for contrast. This desk looks great in living rooms, bedrooms, or quiet corners.
It’s a mix of style and storage, great for writing, paying bills, or just displaying your favorite things.
20. Rustic Blue Rocking Chair

A wooden rocker painted in faded blue adds class and comfort to any space. Use a soft, dusty blue paint and sand lightly for that rustic finish.
Place it on a porch, in a reading nook, or next to a fireplace. Add a small pillow or throw blanket for comfort.
It’s simple, peaceful, and feels like something passed down through the family, even if you just painted it yourself.
Chalk Paint Projects with Character
Chalk paint gives furniture a soft, matte look that’s full of class. It’s easy to use and perfect for giving old pieces a gentle, vintage-style makeover with real personality.
21. Soft Gray Chalk Painted Dresser

A soft gray dresser feels calm and cozy in any room. Chalk paint goes on smoothly and doesn’t need much prep. After painting, lightly sand the edges for a touch of wear.
Add white or silver knobs for a clean finish. This makeover is perfect for bedrooms or guest rooms and fits with almost any color scheme.
It’s simple, classic, and makes old furniture feel fresh again.
22. Antique White Side Table with Wax Finish
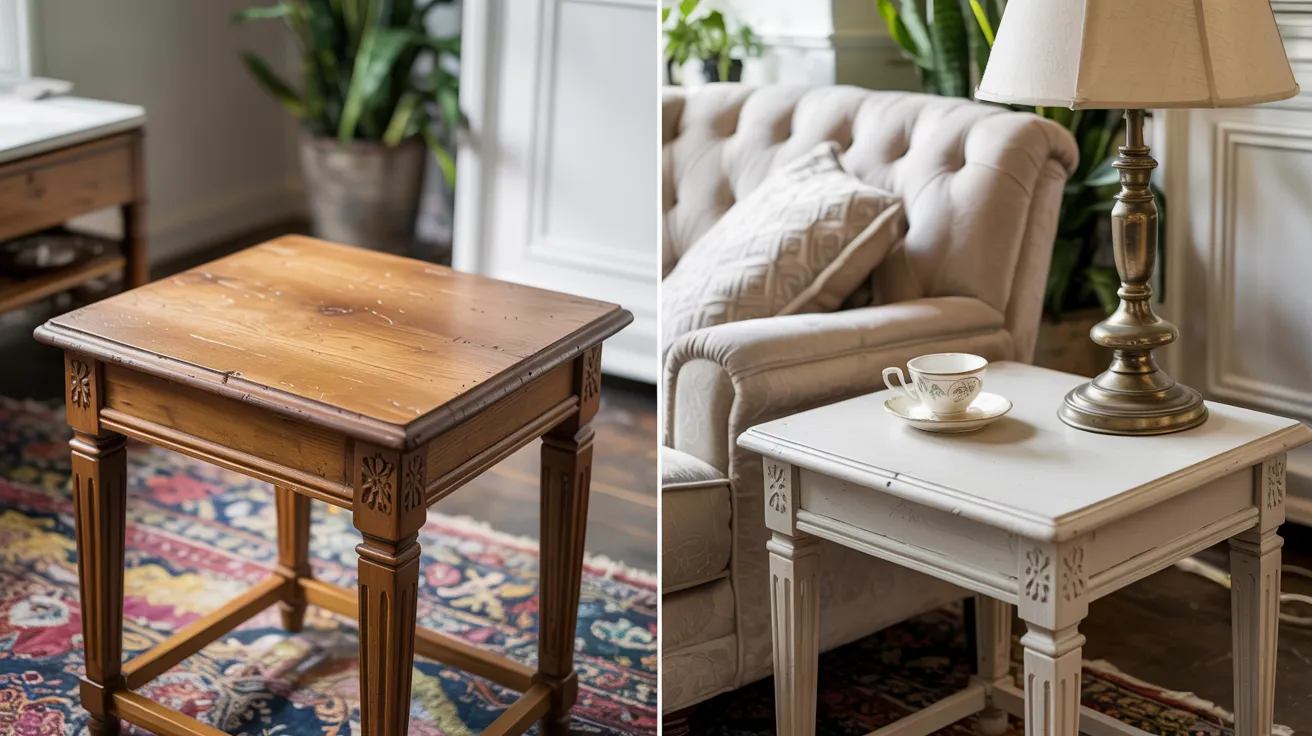
Paint a small side table in antique white for a clean but old-style look. Chalk paint gives it a matte finish, and a coat of wax adds protection and a slight shine.
Rub the wax in gently with a cloth. This look works great next to a sofa or bed. It’s light, pretty, and brings soft style to any little corner of your home.
23. Lavender Chalk Painted Armoire

Lavender is soft and a little unexpected, making it perfect for a statement armoire. Use chalk paint for an easy coat, then distress lightly if you want that worn look.
Add glass or floral knobs for extra class. This color works well in bedrooms, craft rooms, or nurseries.
It brings just enough color to be fun, but still feels gentle and calm.
24. Warm Beige Console with Layered Effect
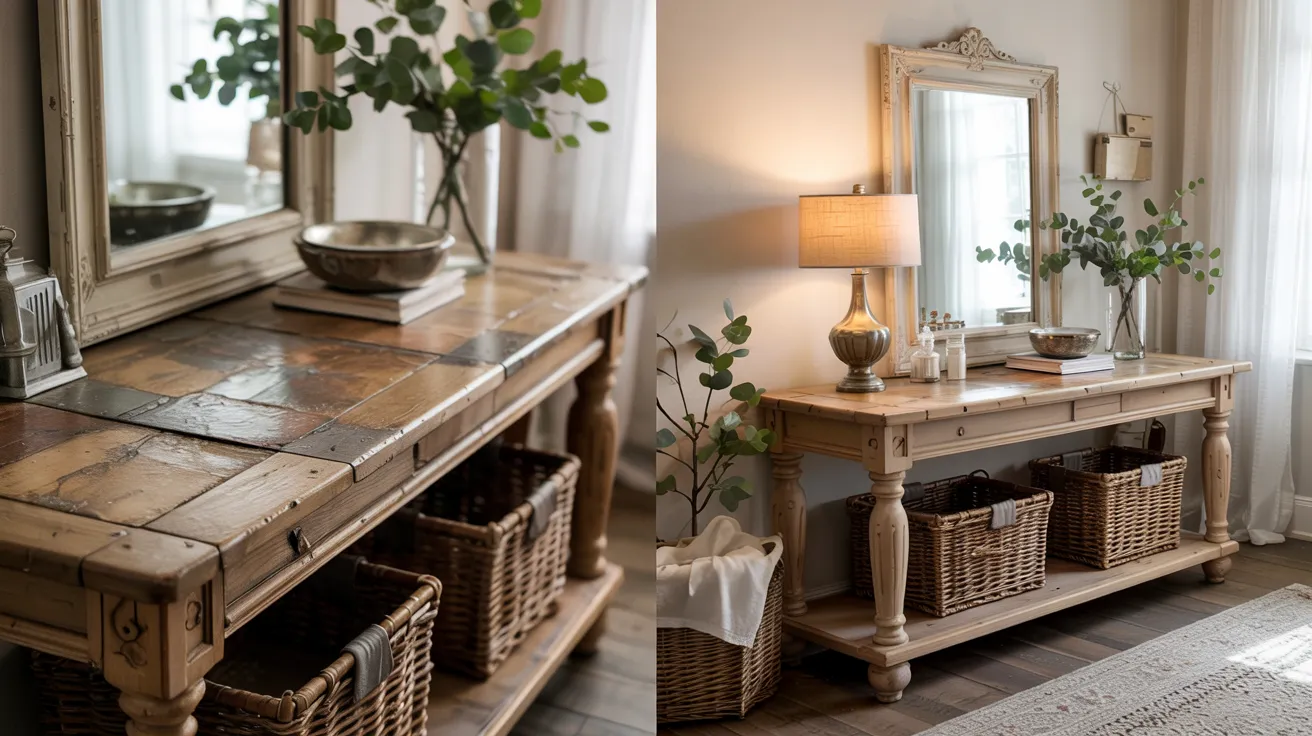
Try a layered chalk paint finish in warm beige tones for a rich, rustic look. Start with a base coat, then lightly brush a second shade on top.
Wipe back areas to let both colors show through. Finish with wax for a soft glow. This works great for hallway or TV consoles.
The look feels warm and collected, like something that’s been part of your home for years.
25. Robin’s Egg Blue Chalk Painted Shelf

Robin’s egg blue is a happy, fresh color that brings new life to a plain shelf. Chalk paint makes it smooth and soft-looking.
Use it to hold plants, books, or small treasures. This makeover works well in kitchens, bathrooms, or bedrooms.
It’s a small project with a big impact, perfect for trying chalk paint if you’re new to it and want to add a pop of gentle color.
Milk Paint Furniture Before and Afters
Milk paint gives furniture a soft, old-world finish that looks like it’s been passed down for generations. These before-and-afters show how a natural paint can make a big impact.
26. Chippy Green Milk PaintHutch

This old hutch gets new class with chippy green milk paint. Mix the paint and apply it in thin layers. Don’t worry if it cracks or flakes a bit, that’s part of the style.
Sand lightly to bring out that aged look. This piece works great for dishes, plants, or storage.
It brings a cheerful farmhouse vibe and makes even the most worn-out furniture feel full of life again.
27. Soft Blue Milk Painted Nightstand
A small nightstand painted in soft blue milk paint brings calm to any bedroom. The thin paint lets the wood show through slightly, giving it an airy, natural look.
Finish with hemp oil or a clear wax to protect it and bring out the color. This is a great first project if you’re new to milk paint. It’s quick, easy, and adds class with just a little effort.
28. Deep Red Vintage Milk Paint Table

Rich red milk paint adds warmth and drama to an old table. After mixing and painting, let the natural chipping happen as it dries.
You can help it along by sanding lightly on the edges. This bold color works well in dining rooms or as an accent piece in a hallway.
It feels cozy and vintage, like something you’d find in an old cottage or farmhouse.
29. Warm Mustard Sideboard
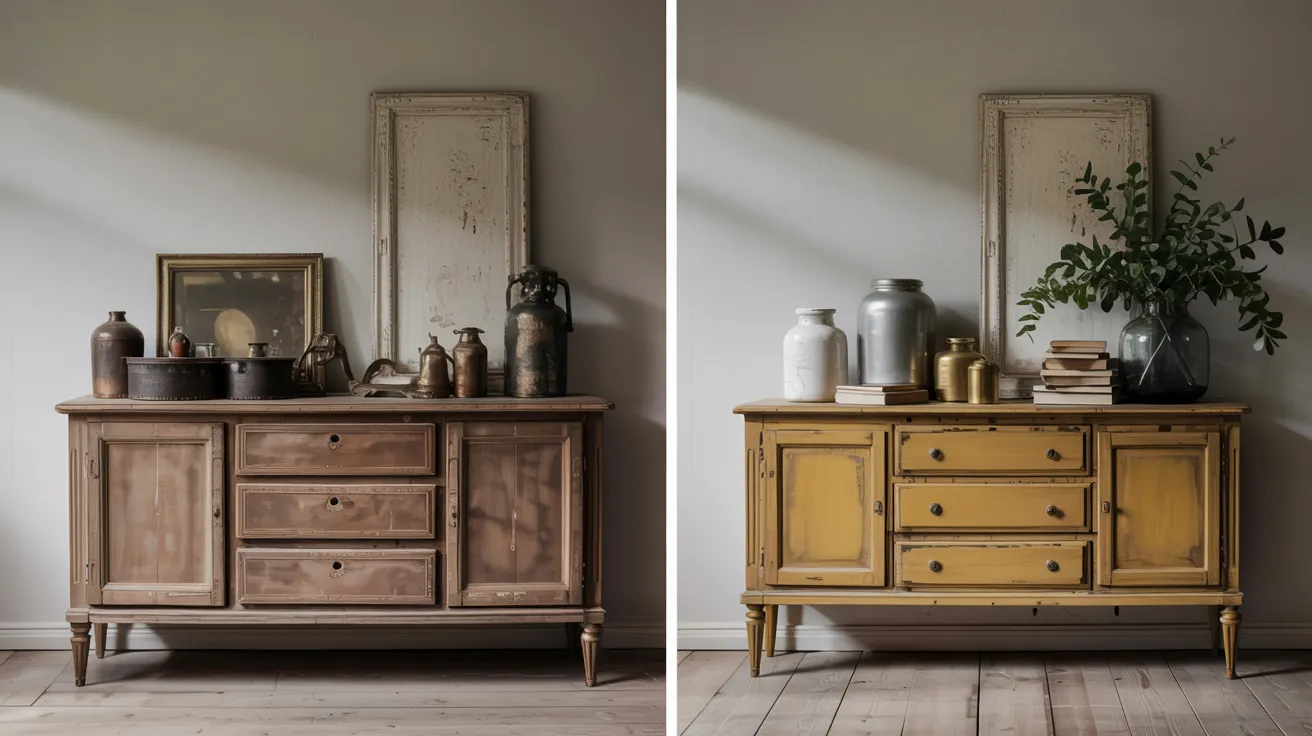
A mustard yellow sideboard makes a happy, eye-catching statement. Mix your milk paint, apply in layers, and don’t overwork it; imperfections give it character.
Once dry, seal with oil or wax. Add simple black or wood knobs to finish the look.
This piece is perfect for kitchens or living rooms and adds just the right amount of boldness while still feeling grounded and old-fashioned.
30. Whitewashed Cabinet with Milk Paint

For a soft, beachy feel, try whitewashing a cabinet with milk paint. Mix the paint thinner than usual and brush it on lightly so the wood grain shows through.
You can layer it until you get the look you want. This technique works great for display cabinets, bookcases, or even bathroom storage.
It’s simple, fresh, and gives a peaceful, well-loved look to any space.
Functional Room-Specific Ideas
Some furniture flips work best in certain rooms. These room-based makeover ideas are not just pretty—they add function, storage, and style where you need it most in your everyday spaces.
31. Nursery Changing Table in Light Blue
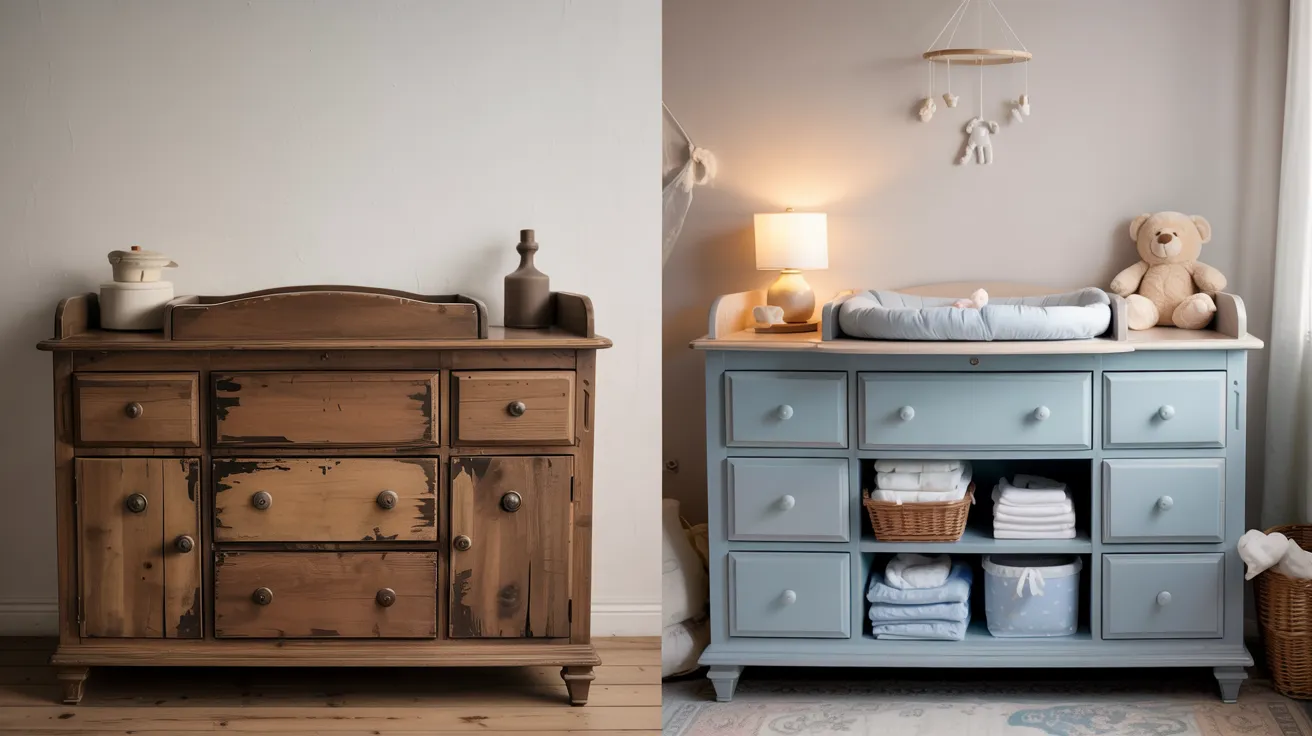
A changing table painted in soft light blue brings calm to a nursery. Use non-toxic, baby-safe paint and seal with a gentle topcoat.
Add cute knobs or soft baskets underneath for diapers and supplies. This color works well for both boys and girls, and the piece can grow into a regular dresser later.
It’s sweet and soothing and turns a simple item into a lovely part of the nursery.
32. Kitchen Island Flip in Pale Yellow

Brighten up your kitchen with a repainted island in pale yellow. Sand the piece well and use durable paint that can handle spills and cleaning.
Add hooks or a towel bar on the side for extra function. Yellow makes the space feel sunny and warm without being too bold.
This is a great way to reuse an old dresser or cart and make it work hard in the kitchen.
33. Painted Entryway Table with Hooks
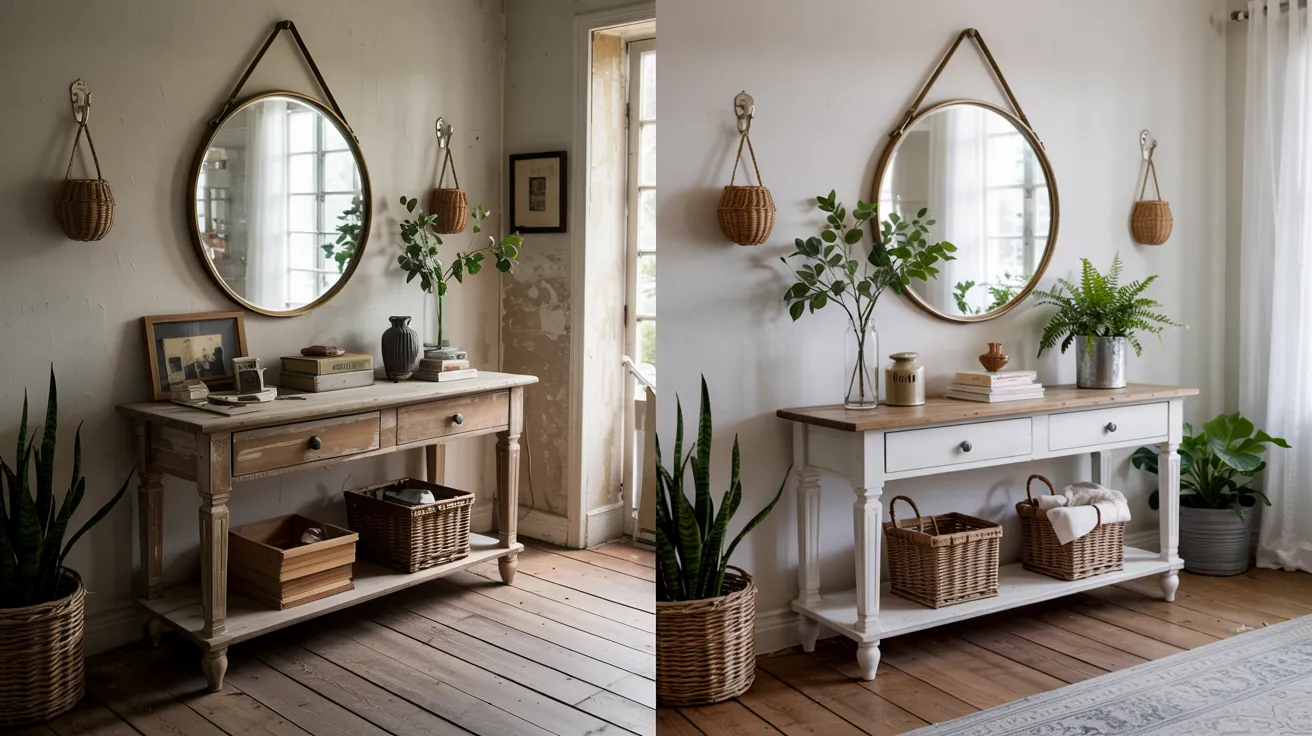
Paint a small table for your entryway in a color that matches your walls or door. Add a few hooks above it for keys, bags, or hats.
Use baskets underneath for shoes or mail. This piece makes your front door area feel neat and welcoming. Choose a strong paint that holds up to daily use.
It’s a smart and simple way to stay organized and add class.
34. Living Room Side Table Refinish
Refinish a tired side table to give your living room a fresh look. Sand off any old finish, then paint it in a color that fits your decor, try soft gray, navy, or creamy white.
Add a new knob or stencil a simple design on top if you’re feeling creative. This small upgrade makes a big difference and gives you a spot for books, remotes, or coffee cups.
35. Laundry Room StorageHutch
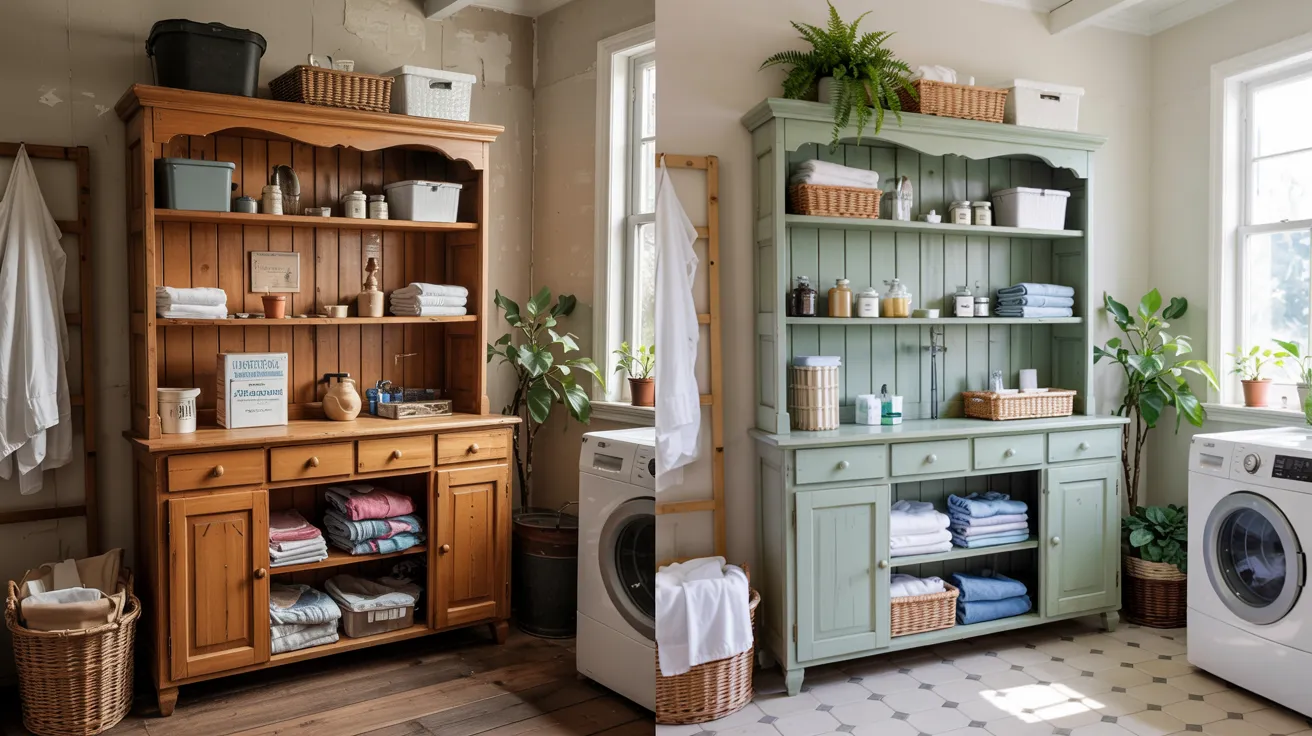
Add extra storage to your laundry room with a painted hutch. Use a bright or clean color like white, green, or even blue. Paint it inside and out for a finished look.
Add baskets or jars for holding detergent, clothespins, and towels. This makeover makes a forgotten space feel more useful and cheerful.
It helps keep everything in place and makes laundry a little easier.
Unique Techniques & Finishes
Looking to go beyond solid color paint jobs? These furniture projects use special techniques like ombre, stencils, and clever tricks to create one-of-a-kind finishes that make any piece stand out.
36. Ombre Painted Tallboy

An ombre effect adds a soft fade from dark to light, perfect for a tall dresser. Pick one color and mix lighter versions of it for each drawer.
Start with the darkest shade at the bottom and work your way up. Use painter’s tape between drawers to keep lines clean.
This look adds depth and style without being too busy. It’s a cool way to show off color and creativity.
37. Stenciled Coffee Table
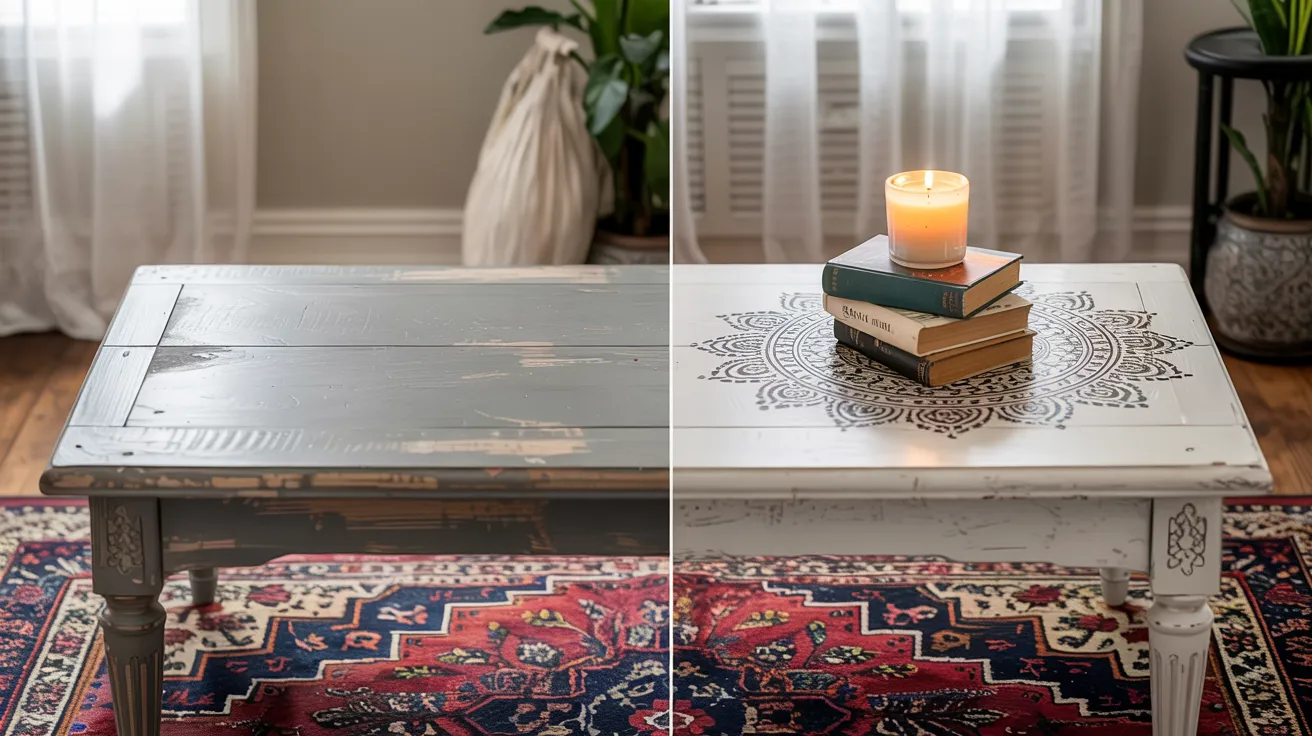
Add detail to a plain coffee table with stencils. After painting the base color, place a stencil on top and gently dab a second color over it using a sponge or small brush.
Peel the stencil carefully to reveal the pattern. You can do florals, geometric shapes, or even letters.
This method is fun, easy, and gives your table a designer touch without needing fancy tools.
38. Two-Tone Cabinet with Wood Accent

Mix paint and natural wood for a clean, modern look. Paint the cabinet body in a neutral color like olive or light gray, but leave the top or drawer fronts in natural wood.
Sand and seal the wood to keep it smooth and rich-looking. This style works great in kitchens, bathrooms, or living rooms and shows off the beauty of wood while still giving a fresh painted look.
39. Color-Dipped Chair Legs
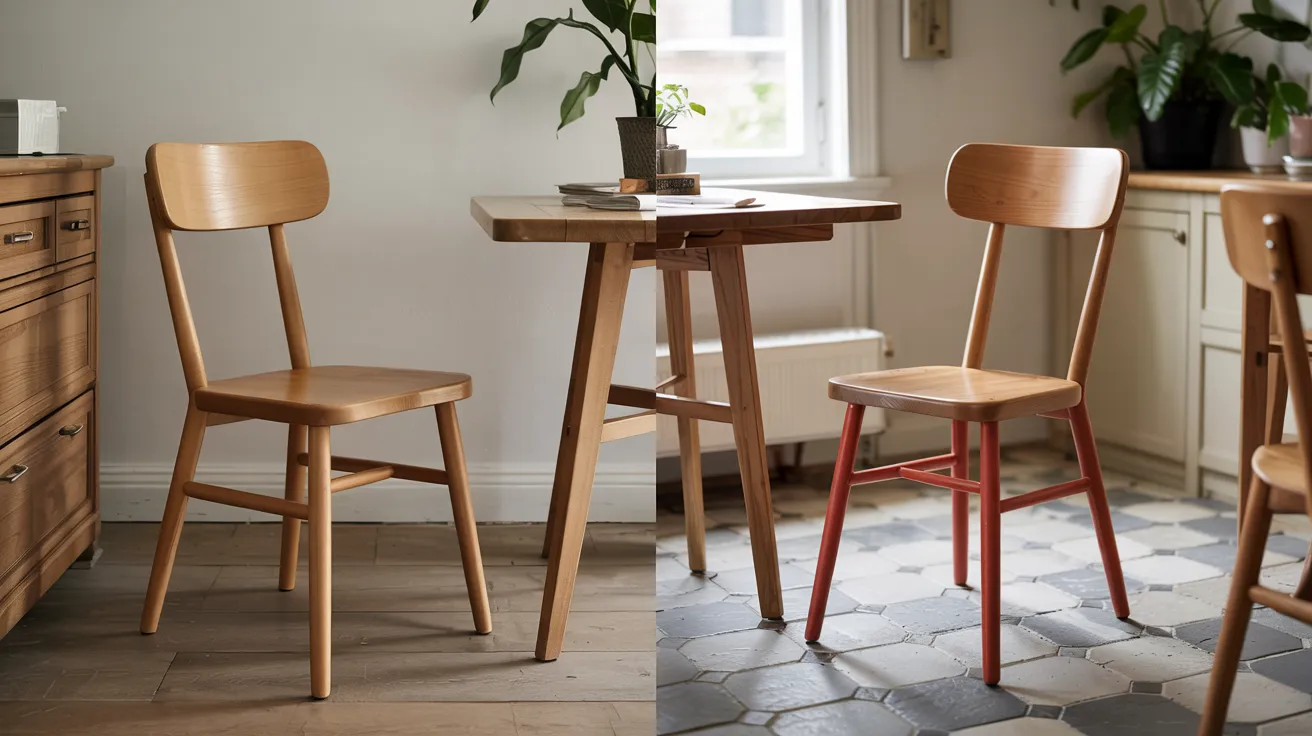
Try color-dipping to add a playful twist to your chairs. Tape off the bottom few inches of each leg and paint just that part in a bright or bold color.
Let it dry and remove the tape for a clean line. This works well with dining chairs, stools, or even a bench.
It adds just enough color to make a statement without repainting the whole thing. Quick, simple, and fun.
40. Faux-Aged Chest Using Vaseline Method
Want a worn, rustic look fast? Try the Vaseline trick. Rub a bit of Vaseline on the spots you want the paint to resist—edges, corners, or handles.
Paint over the whole piece, and once it dries, wipe off the Vaseline areas with a cloth. The paint will lift off where the Vaseline was, giving a natural, aged look.
It’s easy and great for getting that vintage farmhouse style.
Final Thoughts
You’ve now seen how powerful a little paint can be through all these painted furniture ideas before and after.
If you’re flipping a thrift store find or revamping your old dresser, you now have the tools, techniques, and ideas to start confidently.
Remember, it’s not about perfection, it’s about creating something that reflects your style and makes your space feel like home.
Start small, trust the process, and have fun with it. Want more makeover ideas, tutorials, or paint tips? Check out my other DIY guides to keep the inspiration going.